DNS is a Domain Name System which connects your request for www.example.com to the server’s IP where www.example.com resides. In other words, when you enter in your browser www.example.com, your PC connects to the authoritative DNS server for this domain, requests destination IP and retrieve website’s content from the hosting server.
What is DNS leak and why it can be a problem?
When you connect to the VPN (check this article on how to connect to the OpenVPN) your traffic is being encrypted and routed through a VPN server. So, if somebody intercepts your traffic he will only be able to see how you connect to a VPN server and no information about what websites/servers you visit. This changes with DNS leak. When you connect to the VPN, your PC should also request new DNS from the VPN and update it’s network config. For different reasons, your PC may fail to update the DNS during connection to the VPN and when you will be browsing Internet, your DNS requests will go through your ISP’s (Internet Service Provider) DNS server which will reveal which websites/servers you access. Your traffic will still be encrypted but your privacy will be compromised at this point.
How to check DNS leak?
There are various websites for easy DNS leak test. Simply, Google “DNS leak test” or visit below websites:
How to fix DNS leak?
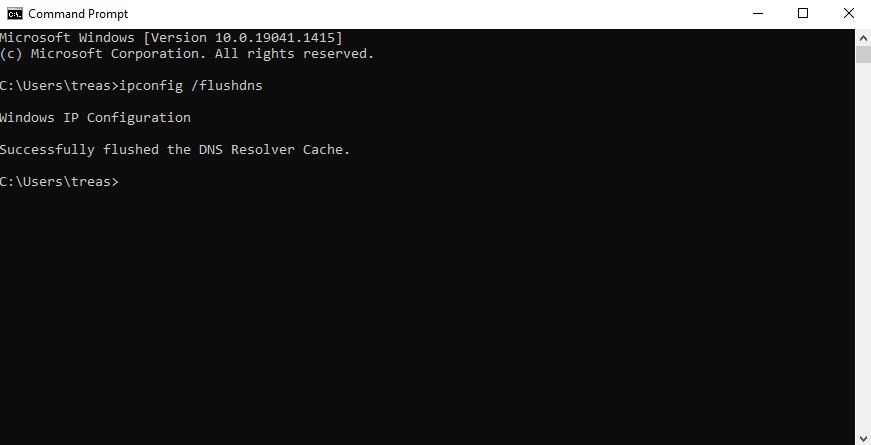
Manual fix (Windows OS)
Run “cmd” and issue the command below. It will force update DNS and your PC should start using VPN’s DNS. Run DNS Leak test to make sure it worked.
ipconfig /flushdns
Automated fix
For Windows there is also an automated solution – a script which will update DNS every time you connect to the VPN server. Download and install.
https://www.dnsleaktest.com/assets/dnsfixsetup.exe
Public DNS
Another solution is to always use public DNS for your Internet configuration.
- Open “Network and Internet” settings
- Select “Change Adapter options”
- Right click on your Internet Connection (either Ethernet or Wireless) and go to “Properties”
- Double click on “TCP / IPv4”
- Select “Use the following DNS server addresses” and enter Preferred and Alternate addresses below.
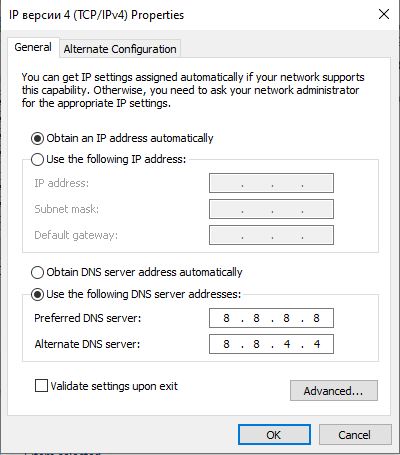
Cloudflare Open DNS enter 1.1.1.1 and 1.0.0.1;
CISCO Open DNS enter 208.67.222.222 and 208.67.220.220;
Google Open DNS enter 8.8.8.8 and 8.8.4.4